
- Help your child with ASD understand the plans for the day
- Use photos of real people and real places where possible
As part of his autism, my son often struggles to understand what has been planned for the day and the week ahead, if he is only told verbally.
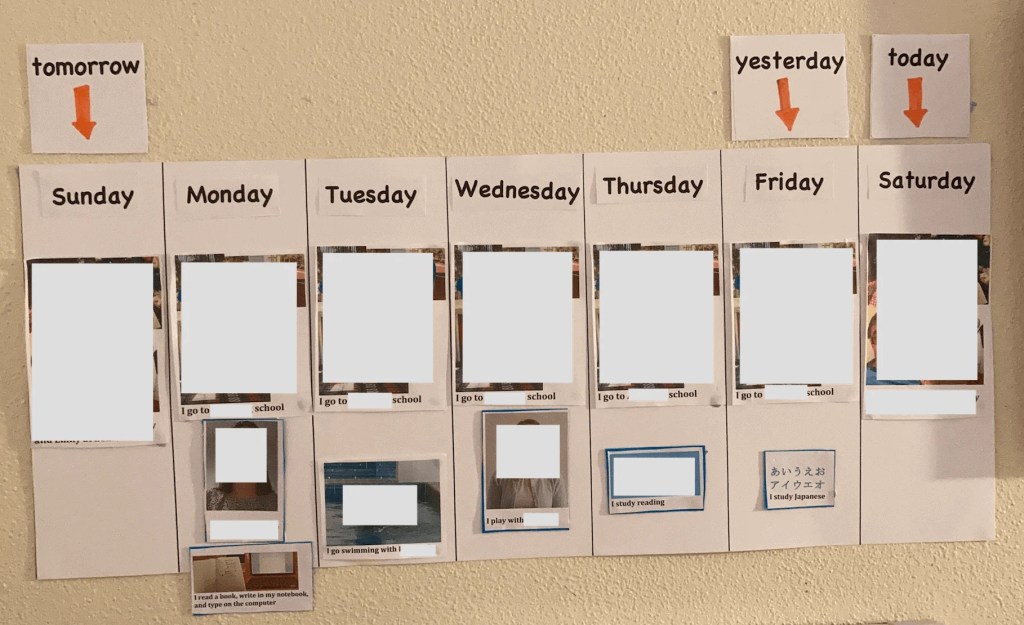
So, since the early days, I have created a visual weekly schedule to put up in the dining room, so that we can look at it together over breakfast.
Here’s how I do it.
Why it works
Since he was little, my son often showed resistance to activities or transitions throughout the day. Eventually, I came to realise that this was at least partly because he did not understood what was planned and expected of him, and he felt anxious.
By explicitly outlining the events for the day, and the week ahead, I was able to give him a sense of security. I know this because, even now, he looks at the weekly schedule multiple times throughout the day and notices any changes, however minor!
His dining room weekly schedule is basically the long-range forecast version of the visual aid for transitioning between activities. In fact, we have a separate sheet of paper up on the wall that covers big events throughout the year, which he also loves to track.
Use real photos
Since the early days of his diagnosis, my son has responded better to real photos of actual people and places, rather than illustrations and symbols (I talk about this in the posts about creating photo books for speech practice, toilet training and others.)
For his first weekly schedule, when he had not yet learned to read, I used photos of him, his school teachers, school and other locations he frequents. I took care to choose angles and settings that he was familiar with. For example:
Photo of the school: I used a picture of inside his classroom, rather than the entrance to the school building which he only sees briefly each day.
Swimming class: I took a photo of him actually swimming during class, rather than the outside of the pool complex.
Study session: I took photos of the actual pens, notebooks and apps he was using.
Use blu tack
I glued the photos on card and used blu tack to stick them on to the schedule, so that I could take them off and rearrange them as needed.
Yesterday, today, tomorrow
Once my son was able to read, I added signs that said ‘Yesterday’. ‘Today’ and ‘Tomorrow’, so that he could see which day was today.
It also helped him understand the passing of time, and gave me opporunities to start conversations during mealtime about ‘What did you do yesterday?’ or ‘Where are you going tomorrow?’
When I added text underneath the photos, I kept the sentences short and specific: ‘I go to [name of playground]’; ‘I go swimming with [name of instructor]’.
Keep it simple
Over time my son learned to understand things by only reading text, and photos were no longer essential for regular or familiar activities. This meant that I could just use a white board and marker to write the schedule at the start of every week.
It took years to get to this point, but now the whiteboard is an essential part of our family routine and of my son’s happiness!
Summary
When taking photos, choose angles and settings that your child is familiar with.
Place the visual schedule near the dining table, so that your child can look at it each morning as part of their routine.
